


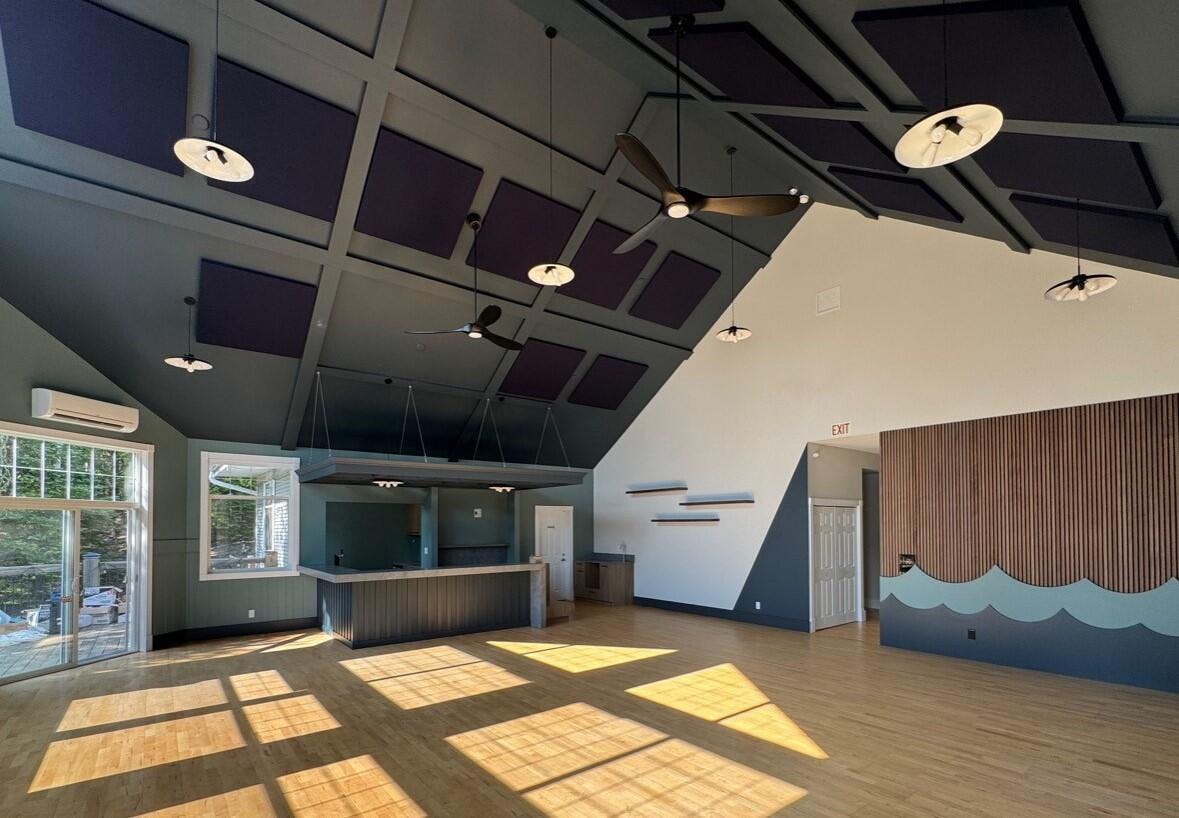
Signature Acoustic Ceiling Panels
Screw Locations

NRC Rating

|
Frequency (Hz)
|
|||||||
|
Imperial |
125 |
250 |
500 |
1000 |
2000 |
4000 |
NRC |
| 1" |
0.11 |
0.24 |
0.73 |
1.03 |
1.10 |
0.87 |
0.80 |
| 2" |
0.29 |
0.98 |
1.09 |
0.96 |
1.01 |
0.97 |
1.0 |
Fire Rating

ASTM E-84: Class 1 or A
CAN/ULC S102: Class A
Lead Time

Products will be ready to ship within 2-4 weeks from order date.
Standard size orders will typically ship via UPS or Purolator. Large orders will be shipped via an LTL or dedicated truck. Carrier will be determined based upon your location.
Selecting Panel Thickness
Shipping

We ship across Canada and the United States using trusted carriers. Flat rate shipping is either $50 or $75 depending on order size and location. Larger orders may require pallet shipping at $195 per pallet. Production time is typically 2 to 4 weeks, with delivery in 2 to 8 business days once shipped.
Most orders do not incur duties or import fees.
See our full shipping policy for more details.
Cleaning & Care Instructions
To remove surface dust and dirt from the fabric, use a vacuum with a horsehair duster brush attachment. If vacuuming doesn't fully clean the fabric, gently dab it with a slightly damp cloth. Use a white cotton cloth and a solution of mild detergent mixed with water. Be sure to wring out the cloth thoroughly to avoid soaking the fabric.
Avoid applying excessive pressure or scrubbing the fabric.
Installation Guidelines & Mounting Details
-
Handle with Care:
- Always carry panels with two people if they’re big. Wear white gloves to keep them clean.
-
Plan Your Layout:
- Mark where each panel will go on the ceiling.
-
Mark the Screw Holes:
- Hold the panel up to the ceiling and use it as a template to mark screw holes with an awl. Two people should do this to keep it steady.
-
Drill the Holes:
- Drill small starter holes first, then widen to ½ inch. For multiple drywall layers, use longer screws.
-
Install Toggle Anchors:
- Follow these steps for toggle anchors:
- Turn the metal part so it can fit through the hole.
- Insert, then pull it down so it opens behind the drywall.
- Push the locking cap against the ceiling and break off any extra plastic.
- Follow these steps for toggle anchors:
-
Insert Screws into Panels:
- Put screws through the panel holes with studs on them.
-
Lift the Panels into Place:
- With two people, lift the panel and align screws with anchors.
-
Secure the Screws:
- Screw each one in slowly. Don’t tighten too much to avoid damaging the panel.
-
Attach Buttons:
- Use the button tool to snap buttons onto the screws.
-
Clean Up:
- If dusty, use a vacuum with a soft brush to clean the panel surface.
Detailed Instructions and Mounting Details:
We Also Recommend


Customer Reviews
The panels came in a very timely manner, were very easy to install and has reduced the sound reverberation in the space tremendously. We are extremely happy with the final results.
Thank you Donna! Glad to hear you are happy with the end result.